A bad sector, also known as a “surface defect”, is simply a sector on a computer’s disk drive that is physically damaged and therefore unable to be read. Usually, it is detected by the SCANDISK or CHKDSK utilities software that your operating system is equipped with.
When SCANDISK or CHKDSK find the bad sectors on your drive, they mark them so that the operating system will skip them in the future. This is known as standard disk repair
How to convert a PDF file to Word, Excel or JPG format
One common question I’ve run across a lot these days in the office is how to convert a PDF file to Microsoft Word format (doc), Excel format (xls), or JPG picture format. Usually, people want to know how to convert a file to PDF, but it’s also nice to be able to convert back the other way. Converting to Word is actually pretty simple and can be done directly using an online file conversion service called Zamzar. Going to Excel or JPG is a two step process, but nothing very difficult to follow.
Update: There’s a much easier way to convert a PDF to JPG image format than the method I have mentioned below. Here’s how you can do it using Zamzar.com.
Convert a PDF file to JPG - Easy Way
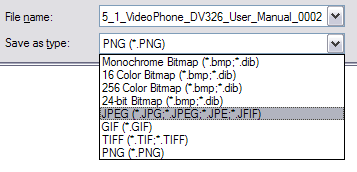
Go to ZamZar.com, browse for your file and choose PNG format for the format to conver to under Step 2. PNG is another newer picture format that is slowly replacing the JPG format. Most programs that can open JPG files can open PNG. Zamzar automatically converts each page in the PDF document into it’s own PNG picture file. Now you can simply open Microsoft Paint (yes, all you need it Paint!) and choose File - Save As from the menu and choose JPEG from the drop down list of formats.
That’s it! By the way, if youare interested in how to extract the text from a PDF document or how to convert Word files to PDF, etc, check out the links.
Convert PDF to JPG Format - Second Way
The first thing you’ll need to do is download a free software (the only one I could find) that converts PDF documents to JPEG image format automatically. Go to the Omniformat download page and download both Omniformat v8.3 and the PDF995 app. You will need to download and install PDF995 first before installing Omniformat. Once you have both programs installed, go to your Start Menu programs, find the program group Software995 and click on Omniformat.

The only annoying thing about this program is that it requires you to view some ads for about 30 seconds! However, it’s better than paying $20 or $40 for a program just to do a simple conversion! It does pop up another instance of your browser window for the web site of each of the sponsors, but it does not install any spyware onto your computer (no popup ads). Once the program is loaded, you’ll see it has a section called “Watch Folders” and then a button at the bottom titled “Start Monitoring” and “Single Pass“.

Basically the way it works is that you need to COPY the PDF files you want to convert to JPG format to the C:\omniformat\watch folder and then press Single Pass. The program will look in that directory and convert each page of each PDF into a separate JPG file. If you click Start Monitoring, you can keep dropping PDFs into that folder and the program will automatically convert them into JPGs as long as the program is open. Note that the program DELETES the original PDF document that it uses, so that’s why you need to COPY the PDF document to the watch folder, not move it! You should now see your converted files like below:

Convert your PDF to a Word document
Go to Zamzar.com and click the Browse button next to Step 1 and choose your file. By default, Step 2 will be set to DOC format, but you can choose to convert your PDF to other file types such as TXT, HMTL, RTF, etc. Type in your email address for Step 3 and click Convert.
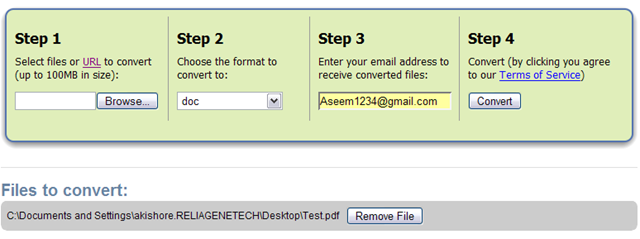
You should receive an email within a few minutes with a download link to your converted file. I have tried out this service on some pretty complex PDF documents with text in multiple columns, multiple images, etc and have been very impressed with it’s conversion accuracy.
Convert a PDF file to Excel format
We will again follow the steps above using Zamzar, but this time choose TXT as the format you want to convert to. Unfortunately, you can’t convert straight to Excel format, so we’ll have to go through the intermediary TXT format. Once you have downloaded the TXT file and saved it on your computer, open Microsoft Excel and go to File - Open and change the Files of Type combo box to All Files.
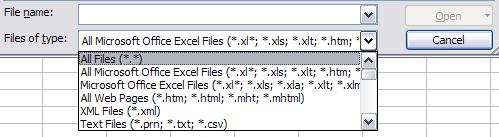
Now you should see the converted text file in the list of files. Choose it and click Open. You’ll now be brought to the Text Import Wizard. You have to open the file in this manner because if you simply right-click and say Open With Excel, all of the text for each row will appear in the first column and not be separated.
For Step 1, choose Delimited from the two options listed.
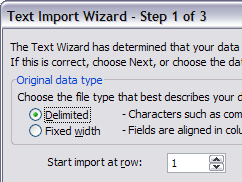
Click Next and check off the Space checkbox as one of the delimiters. Each value should now be separated by a vertical line, indicating it’s going to be in a separate column.

Click Next and then click Finish. You can now save the file as an Excel file by going to File - Save As. There are a few drawbacks, however, as this conversion does not always work perfectly! For example, if the original Excel sheet had a column where there was text with spaces included, each word will be separated into it’s own column! Also, you won’t see any formulas or functions that may have been in the original Excel sheet, only the text.
It’s as easy as that! You can use many other image editing programs also such as Photoshop, Corel, etc, etc, but I chose Paint because that is universally available on just about every Windows computer.
How to detect computer & email monitoring or spying software
As an IT Pro, I routinely monitor employee’s computers and emails. It’s essential in a work environment for administrative purposes as well as for security. Monitoring email, for example, allows you to block attachments that could contain a virus or spyware. The only time I have to connect to a user’s computer and do work on directly their computer is to fix a problem.
However, if you feel that you are being monitored when you shouldn’t be, there are a few little tricks you can use to determine if you’re right. First off, to monitor someone’s computer means that they someone can watch everything that you are doing on your computer in real time. Blocking porn sites, removing attachments or blocking spam before it gets to your Inbox, etc is not really monitoring, it’s more like filtering.
Computer Monitoring
So now, if you still think someone is spying on you, here’s what you can do! The good thing right now is that neither Windows XP SP2 nor Windows Vista support multiple concurrent connections while someone is logged into the console (there is a hack for this, but I would not worry about). What this means is that if you’re logged into your XP or Vista computer (like you are now if you’re reading this), and someone were to connect to it using the BUILT-IN REMOTE DESKTOP feature of Windows, your screen would become locked and it would tell tell you who is connected.
So why is that useful? It’s useful because it means that in order for someone to connect to YOUR session without you noticing or your screen being taken over, they have use third-party software and it’s a lot easier to detect third-party software than a normal process in Windows.
So now we’re looking for third-party software, which is usually referred to as remote control software or virtual network computing (VNC) software. First, the easy thing to do is to simply check in your Start Menu All Programs and check whether or not something like VNC, RealVNC, TightVNC, UltraVNC, LogMeIn, GoToMyPC, etc is installed. A lot of times IT people are sloppy and figure that a normal user won’t know what a piece of software is and will simply ignore it. If any of those programs are installed, then someone can connect to your computer without you knowing it as long as the program is running in the background as a Windows service.
That brings us to the second point. Usually, if one of the above listed programs are installed, there will be an icon for it in the task bar because it needs to be constantly running to work.

Check all of your icons (even the hidden ones) and see what is running. If you find something you’ve not heard of, do a quick Google search to see what pops up. It’s usually quite hard to remove something from the taskbar, so if there is something installed to monitor your computer, it should be there.
However, if someone really sneaky installed it and nothing shows up there, you can try another way. Again, because these are third-party apps, they have to connect to Windows XP or Vista on different communication ports. Ports are simply a virtual data connection by which computers share information directly. As you may already know, XP and Vista come with a built-in Firewall that blocks many of the incoming ports for security reasons. If you’re not running an FTP site, why should your port 23 be open, right?
So in order for these third-party apps to connect to your computer, they must come through a port, which has to be open on your computer. You can check all the open ports by going to Start, Control Panel, and Windows Firewall.

Click on the Exceptions tab and you’ll see see a list of programs with check boxes next to them. The ones that are checked are “open” and the unchecked or unlisted ones are “closed”. Go through the list and see if there is a program you’re not familiar with or that matches VNC, remote control, etc. If so, you can block the program by un-checking the box for it!

The only other way I can think of to see if someone is connected to your computer is to see if there are any processes running under a different name! If you go to the Windows Task Manager (press Cntr + Shift + Esc together) and go to the Processes tab, you’ll see a column titled User Name.

Scroll through all the processes and you should only see your user name, Local Service, Network Service, and System. Anything else means someone is logged into the computer!
Email & Web Site Monitoring
To check whether your email is being monitored is quite simple. Always, when you send an email from Outlook or some email client on your computer, it has to connect to the email server. Now it can either connect directly or it can connect through what is called a proxy server, which takes a request, alters or checks it, and forwards it on to another server.
If you’re going through a proxy server for email or web browsing, than the web sites you access or the emails you write can be saved and viewed later on. You can check for both and here’s how. For IE, go to Tools, then Internet Options. Click on the Connections tab and choose LAN Settings.

If the Proxy Server box is checked and it has a local IP address with a port number, then that means you’re going through a local server first before it reaches the web server. This means that any web site you visit first goes through another server running some kind of software that either blocks the address or simply logs it.
For your email, you’re checking for the same thing, a local IP address for the POP and SMTP mail servers. To check in Outlook, go to Tools, Email Accounts, and click Change or Properties, and find the values for POP and SMTP server.

If you’re working in a big corporate environment, it’s more than likely that the Internet and email are being monitored. You should always be careful in writing emails or browsing web sites while at the office. Trying to break through the security also might get you in trouble if they find out you bypassed their systems! IT people don’t like that, I can tell you from experience!
How to create a secured and locked folder in Windows XP
If you’ve come across this page looking for a way to create a password protected, secure, hidden or locked folder in Windows XP for free, you’ve come to the right place. Unfortunately, Windows XP does not have any user-friendly built-in tools to create secure folders on computers with multiple users. Of course, you can encrypt data on your hard disk, but this only helps if your computer is stolen.
In a previous post, I wrote about how you can hide a folder in Windows XP using a rudimentary built-in feature. This method is useful if you want to hide a folder or file and you’re pretty sure that anyone who is using the computer will have no idea how to un-hide the data. If you’re dealing with someone a little more computer savvy, there is another way to create a secure locked folder without having to buy any 3rd party software.
It basically involves using a script to morph the folder into something completely different so that it’s still visible, but nothing inside the folder is accessible. In order to view the data, you have to run another script to morph it back. Anyone who clicks on the folder will be brought to the Control Panel and simply think it is a shortcut.
Here are the steps to create the protected folder in Windows XP:
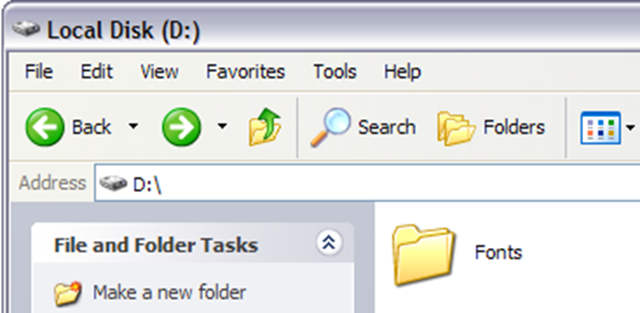
- First create a folder that you will use to store your confidential data. For example, I have created a folder called Fonts at the root of my D drive. Since the hidden folder will bring you to the Control Panel, it’s best to name the folder as one of the programs inside there.
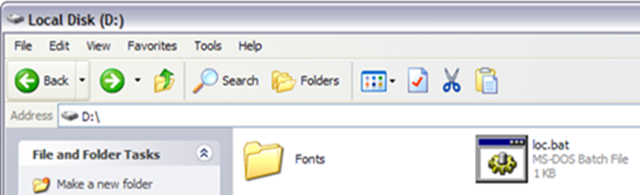
- In the same location where you created the new folder, create a new file in Notepad, copy the following below into it, replace Fonts with the name of your folder and save it as loc.bat.
ren Fonts Fonts.{21EC2020-3AEA-1069-A2DD-08002B30309D}
- To save the file as a .bat file in Notepad, just put the whole thing in quotes, like “loc.bat” and then click Save.

- Now you should have a bat file named loc in the same directory as your Fonts folder, not inside the Fonts folder.
- Create another NotePad file and type in the following listed below and save it as “key.bat”.
ren Fonts.{21EC2020-3AEA-1069-A2DD-08002B30309D} Fonts
- Now you’ll have loc.bat and key.bat along with your folder. Go ahead and double-click on loc.bat and your folder will turn into the Control Panel and nothing inside can be viewed. Clicking on it will simply bring you to the Control Panel. You’ll notice the icon should have changed also.

- To view the data inside your folder again, click on key.bat and your folder will return to normal! Pretty simple!
Of course, keeping the key.bat file in the same folder will defeat the purpose of securing the folder, so it’s best to move the key.bat file somewhere else, or even better, put it on a USB stick or CD that only you can access.
Most people will be probably look at the folder and simply ignore it since it has the control panel icon and it links directly there. Of course, if someone knows this trick also, they can create their own key.bat file, etc and open it back up. However, if you’re dealing with someone who can do all of that, it’s best you check out more advanced 3rd party software to lock down a folder.
ALTERNATIVE METHOD:
If you’re having trouble with the above-mentioned method (from what I can see from the comments, a good number of people), then here’s another quick and free way to create a secure folder in Windows XP. There is a very nice program called Free Hide Folder from Cleanersoft that allows you to easily hide your private folders.
Your folders are completely hidden and you must supply a password to open the program to unhide the folders. The personal edition is free, just click the Skip Registration button unless you’re using it for commercial purposes.
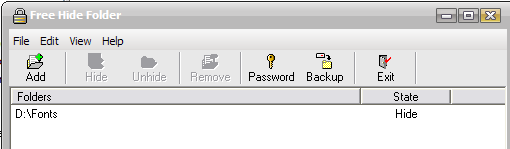
I’ve tried this program myself and I cannot access the hidden folder via Windows Explorer nor the command prompt. So if the above method is not working, give this a shot!
ImagIcon - Convert multiple image formats (JPG, BMP, PNG) into Windows icons
Here’s a nifty little utility that you can use to take any picture that is in BMP, JPG, or PNG format and convert it into BMP, JPG, PNG or ICO format. Using this program, you can take your favorite picture of your girlfriend, let’s say, and convert it into a Windows Icon. Then you can replace out your My Computer icon with her face rather than a boring computer! Hmmm or maybe you don’t want to see her that much…!!
Anyway, the program is called ImagIcon and it’s not only a tiny program, but it does it’s job very well. You can take an image and save it as an icon in all of the different sizes: 16×16, 32×32, 48×48, and 64×64. The 16×16 size can be used to give your web site a logo in the IE address bar. For example, in Blogger while writing a post, you can see the orange icon in the address bar:

The program also lets your transform the images if you like. You can scale the image to make it smaller or flip it horizontally or vertically. You can even save the icon with alpha transparency! And if you don’t care to save the image as an icon, you can convert between any of the three formats: PNG, JPG, or BMP.

Simply drag a picture into the colored area after configuring your settings and the picture is automatically converted! Here I took a picture of my wife & I and dropped it onto the program window. By default, it converts the picture into an icon of 32×32 and puts it in the same folder as the original picture:

You can change the settings by click on the Options menu item. Icon Settings allows you to pick the size of your final icon. Image Transform lets you pick the transformations you want if you are converting between picture formats (JPG to PNG). Remember, you can convert to the same format and simply transform the picture also. So if you have a bunch of JPEG images and you simply want to scale them quickly, then in Save Mode choose JPEG and choose the settings for image transform. And of course Save Mode is the format that you want to convert to. Save Directory is if you want to have the pictures stored somewhere else other than the directory where the originals are located.
And lastly, you can customize ImagIcon itself by choosing different colors or by loading in your own custom image for the background!

Very nice program and very handy, especially for converting images into Windows icons!
Subscribe to:
Posts (Atom)